Sunday, November 28, 2010

Winter wonderland Snowman

Hola friends, thanks for stopping by. I hope you had a great weekend, my was very windy. The weather in Southern Cali is what my friend would call "bipolar"? It changes from one extreme to another. ...lol. It really doesn't help my cold situation, because I've basically been hibernating since Monday of last week. It's been extremely cold for my taste during the night, and we've had fog. rain, and really gusty winds..... I know there's no such things as tornado's or hurricanes in L.A., but I imagine that's what the winds may sound like if I ever experienced one? Anyway, since "the weather outside is frightful".... lol. I thought I'd make this lovely card featuring a snowman in a "winter wonderland" motif. Again I'm experimenting more with lifting the backgrounds inches off the base card, it just gives it a more special feel to the card other than just the centerpiece to be the focal point. The snowman stamp I've had for quite some time. I like that it has it's own shadow as oppose to me adding the light blue hue to give it that effect. also it gave me the chance to finally use some of this SU! Baja Breeze striped ribbon.

And for the inside I wanted to play with another scene, by cutting piece of the same color card stock, Baja Breeze, and edge it with embossing glitter. Unfortunately the camera didn't capture it as I liked but trust me, it looks very pretty..lol And lastly I just wanted to add a simple sentiment, so as to give it room for a written message. I hope you like it. Tootles

Supplies

Paper: SU! Baja Breeze, Whisper white
Stamps: SU! Serene Snowflakes, Inkadinkado snowman
Ink: SU! Baja Breeze, Pacific Point, Stazon black
Accessories: Baja Breeze striped ribbon, pop-ups
Tools: Spellbinder Scallop circles (large)

Friday, November 26, 2010

Your kindness warms my Heart!

Hello Folks, I hope you had a pleasant and hearty meal this Thanksgiving. As for me I could be doing better... I've been ill with the flu these days, but I at least have my love ones and a roof over my head, so I can't really complaint, right? So I mustard up some strength and made a trip to the local craft store for their sale on paper and stamp sets. I found this really cute set from "Fiskars" called Latte Love. It has a variation of tea cups, mugs and coffee containers with cheeky phrases like "you're tea-riffic", "thanks a latte" etc. The best part about clear stamp sets is that you can shape them to whatever angle you want. I wanted to fit the focal point with the phrase all in one to follow the sketch from "Taylor Expressions". I just missed it's deadline but I really liked the sketch that I still wanted to make something with it. I hope you like it?


Supplies


Paper:  DCWV Christmas classic, SU! Chocolate chip, Very Vanilla, Crumb
Ink:  Stazons black, SU! Real Red, Baja breeze
Accessories: Crumb 1/4" ribbon, silver brads, button, twine, pop-ups
Tools: Cuddle bugs "D'vine swirl, Seeing spots,

Wednesday, November 10, 2010

Um from Umbridge Birthday

Hello everyone, thanks for stopping by...Today's card was inspired by Tim Burton's Alice in Wonderland..... particularly the scene where Alice runs into The Queen of hearts, she introduces herself as "Um from Umbridge". I really fell in love with the dress they made her from the once she went into the Queens castle.

Well this was my inspiration, so the hard part was yet to come. It took me about two weeks to implement this onto a card?! I knew that I wanted to use the same colors shown on the picture but how do I use the same sheering of the dress. I kept in mind the McQueen card I did months ago and try to come close as possible to the design. For days my desk was in disarray.. failed designs, different drafts of cut pieces of black and white design paper and no success?! Then finally a break... Monday rolled around and Mojo Monday came to the rescue... after studying the sketch I knew I could come up with my card.

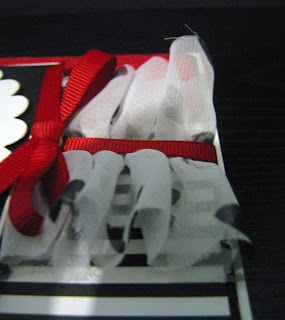
I started with a plain white base, then layered it with basic black. I used Real red cardstock for the left side and embossed it with Cuddle bug's "seeing spots" for texture. For the right side I used a stripped black and white design paper I purchased from the local craft store. now here comes the head scratcher... how would I add a sheered look for the card....? Then it hit me that I still had scraps of the chifon from my halloween costume... I stamped black hearts with "Stazons" black ink and to my surprise, the ink did not bleed through... so I didn't have to wait for it to dry. I then hit the sewing machine and sewed on the middle to then pull the thread for a ruffle effect.


To avoid the lift of the ruffle, I secured a piece of Real red 1/4" ribbon from the top of the card and use strong adhesive tape and strapped it down on the other end. For the centerpiece, I used the plain white paper layered with black and added the final piece.


I used my Spellbinder, Nestabilities scallop circle edge, sponped Baja breeze in the middle for shadow and added my digi-dressy Camille from Greeting Farm. And just like "Um's" dress I added itty bitty little hearts and stripes on her dress. And for the sentiment I used , what esle but the SU! Itty bitty birthday set of course..lol.


And here it is, the finished product... It took a while but it paid off in the end..I hope you like it.

Wednesday, November 3, 2010

Autumn Greetings

Hello and thank you for stopping by. Today's card is inspired by Taylored Expressions sketch artist Jami Sibley.


So far this is one of my favorite sketches this month. I wanted to make a fall or autumn card, especially since I recently purchased a clear stamp set from Inkadinkado called Autumn foliage. Very pretty for set for thanksgiving or fall cards and crafts by the way.


Even though I mentioned the the new set I purchased I did find it hard to implement those images on to this card so I just used the sentiment and save it for another sketch.. so stay tuned...lol So for the base of the card I used SU! Crushed curry card stock followed by Very vanilla and for texture I used My minds eye Quite Contrary set and embossed it with Cuttlebugs D'vine swirl folder. For the middle pieces I used the Martha Stewart doily edge punch and a piece of the SU! Bella Rose dsp (retired) brown polka dot paper.  For the centerpiece I used the Nestabilities Labels 3 to cut out the Crushed curry and Vanilla white. On the Vanilla piece I sponged the edges with SU! Baja breeze ink. for my sunflower and leaf images... I wish I remembered where I purchased it... it was so long ago... I just remembered that the place I purchased it from was called Stampa-Barbara.. neat, huh? lol And for the finishing touches, I used the Inkadinkado called Autumn foliage and for a splash of added color I used the black and white checkered ribbon... pretty huh..I hope you like.

Sunday, October 31, 2010

Sweet always birthday card

Hi eveyone, I hope you're having a spectacular Halloween weekend... I know I have. I didn't realize how many costumes I owned... I had two parties to go to and I had 4 costumes to choose from of what was already in my closet from previous years.... It's one of my favorite holidays.

Okay, todays card is inspired from another verve sketch...... I don't own any of their pieces, but I hope to purchase some soon.


For the base of the card I started off with a basic SU! Whisper white cardstock, followed by Chocolate chip and Regal rose and for a pattern piece I used Pumpkin pie dsp. For three background pieces I used SU! Sweet always dsp. For the two larger pieces I used Pumpkin pie layered with another pumpkin pie pattern piece and Regal rose cardstock layered with the Whisper white stamped with the Fiskars Make a wish quote sentiment and I used the birthdat hats from SU!Party hearty set , flipped them upside down to give it a banner effect using the different colors shown on the pattern pieces. And for the finally touch I used a scalloped circle punch used the SU! Bitty birthday set for the 'happy birthday" sentiment. For the little cupcake I used the SU!Short & sweet set and finished it with a 1/4" chocolate chip ribbon and added some sparkle with the rhinestone brad.... I hope you like it... Happy Halloween!


Thursday, October 28, 2010

"Growing old is mandatory, growing up is optional"

Hey folks, thanks for stopping by. Today's card is from the Fiskars "Make a wish quotes". . . . "growing up is mandatory, growing up is optional"... I love that quote! So I wanted to make it a bit whimsical with the overall design. So I borrowed this sketch....


For the base of the card I started with a basic white and added SU! Raspberry tart dsp(retired) for the second layer. Next I used SU! Red rose and used SU! scalloped edge punch, followed by another piece of Raspberry tart dsp. Then I whipped out my SU! Circle scissor plus tool to cut out the thin circle piece... that took several tries because I needed to secure the piece to my glass cutting mat more securely... learned that the hard way..lol Continuing with a piece of Pretty in pink 1/4" ribbon. For the sentiment portion of the card I wanted to add extra color by stamping in some flowers with SU! Eastern blossoms with Red rose ink and tittered it with some Pink pirouette to give it a two shade dimension and for the tricky part... I used the Kiwi kiss ink for the leaf part by covering the flowers with a posted and added them in.


I finished it up with filling in the flower with SU! Stampin' write summer sun ink pen. And last the Fiskars Make a wish quote by Chili Davis... I hope you like... tootles.

Saturday, October 16, 2010

Masculine Birthday Giftcard holder


Hi everyone, thanks for stopping by. I've been quite busy these days with a big project, going to school and planning a big trip to Mexico after Thanksgiving and returning just before Christmas... I'm cutting it close with the holidays... not much time for shopping, but it's the only time I can get away and the weather is awesome that time of year. Halloween is about two weeks away and I'm already gitty about Christmas holiday... I'm playing "The Holiday" movie (Cameron Diaz, Kate Winslet, Jude Law, Jack Black) as I'm typing away on my blog... lol The weather has changed in So. Cal. again, .... It was nice and toasty on Monday and today we have clouds and a bit chilly..lol chilly... 68 degrees and I'm chilly... I'm sure some folks are rolling their eyes at the thought of that number being thought as chilly... that's room temperature for some..lol


Anyway, today's creation was thanks to Allison Ohran's tutorial for this brilliant gift card holder. I made several for different occasions, because this was so easy to make. I started with SU! Chocolate chip cardstock for the base, then SU! Kiwi kiss dsp(retired) and embossed it with Cuttlebug Spots and dots folder. For the centerpiece I used SU!Crumb cake cardstock and layered it with SU! Very vanilla. The sentiment is SU! Birthday wish stamped in Kiwi kiss ink. And last I lifted the centerpiece with pop-up dots  and added the thin twine. To keep the mini card closed I used thin velcro pieces and the SU! Short and sweet set for this inside. I hope you like it.Toodles.
:
:
:
Stamps: SU! Birthday wishes, Short and sweet.
Paper: SU! Chocolate chip, Kiwi kiss dsp (retired), Crumb cake, Very vanilla.
Ink: Kiwi kiss
Accessories: Twine, pop-up dots, velcro
Tools: Cuttlebug Spots and dots, SU! ticket punch, word window punch, Round tap punch